Saturday, December 31, 2011

Hoppin John

My Grandpa Bill would always say that eating black-eyed peas or Hoppin John on New Years Day would bring you good luck. That's an old Southern tradition... and it's one I like to follow! As my mama would say, "Even if you don't like'em... at least eat one spoonful!"

Happy New Year, Foodies!!!


Hoppin John


Ingredients:

Half-stick of butter or 4 tablespoons
1 yellow onion, diced
3 strips of bacon, chopped into small pieces.
2 celery stalks (ribs), chopped
1 green bell pepper, chopped
1 teaspoon garlic powder
2 cups black-eyed peas, cooked
2 cups rice, cooked
Salt & pepper to taste


Directions:

1. Spray a large skillet with a non-stick spray and cook bacon pieces until crispy brown. Remove bacon to dish layered with paper towel and set aside.

2. Melt butter in a large skillet with the bacon grease. Add onion, bell pepper, celery and garlic powder. Cook for 5-6 minutes.

3. Add peas, rice and a little salt & pepper and cook for 12-15 minutes.

4. Add cooked bacon. Stir.

Friday, December 30, 2011

Cooking Tip #9

Perfect Cream Gravy

Good cream gravy always starts with drippings from pan-frying sausage, bacon, chicken or pork chops. Your gravy will always turn out just right if you use equal parts drippings and flour. The basic proportions are 1/4 cup drippings to 1/4 cup flour to 2 cups milk.

marthawhite.com

Monday, December 26, 2011

Pecan-Crusted Baked Chicken Breast

This was a new recipe I tried from Paula Deen's new cookbook, The Southern Cooking Bible. I admit, Paula has taught me a great deal about cooking in the last few years... I could probably do an entire blog just on her recipes... but then that wouldn't be nearly as exciting. This is probably one of my favorites... and what's crazy, is it's sooo easy to make. The hardest part is crushing the pecans... and that's easy. What's also great is how coating the chicken breasts in mayo, instead of egg yolks, makes the chicken much more tender. A perfect weekday meal for your family!

Pecan-Crusted Baked Chicken Breasts


Ingredients:

4 boneless, skinless chicken breasts (1/2 pound each)
1 1/2 teaspoons salt
1/2 teaspoon black pepper
4 teaspoons mayonnaise
1/2 cup pecans, crushed
3/4 cup bread crumbs


Directions:

1. Place an oven rack in the upper third of the oven and preheat to 350 degrees F. Lightly grease a baking dish or coat with cooking spray.

2. Sprinkle the chicken with 1 teaspoon of the salt and pepper. Coat each breast with1 teaspoon of mayonnaise. In a shallow dish toss the pecans and the bread crumbs together. Dredge the chicken in the bread crumb mixture, pressing firmly to make sure it sticks well to the chicken. Season with the remaining 1/2 teaspoon salt and place in the prepared baking dish. Bake until the crust is nicely browned and the chicken is cooked through, 40 to 50 minutes.

Wednesday, December 21, 2011

Cooking Tip #8

To fully enjoy the tasty, tenderness of pork, and to ensure your pork is cooked to perfection each time, here's some cooking guidelines from pork experts for you to review.

  • Pork should be cooked to an internal temperature of 160ยบ F.
  • Processed pork (fully cooked/smoked ham) should have an internal temperature of 120°F.
  • To prevent pork from drying out while cooking, baste with pan juices, fruit juice or a spicy sauce.
  • Pork's natural juices will run clear when meat is done.
  • Fully cooked pork may have a little pink in the center.


Monday, December 19, 2011

Scarborough Fair Fried Pork Loin Chops

Can you guess why I call these Scarborough Fair Fried Pork Loin Chops? Just sing the song and you'll be able remember the spices used in this recipe! I enjoy using the thin-cut loin chops because they fry up faster... but you could certainly use the bone-in pork chops if you wanted.


Scarborough Fair Fried Pork Loin Chops


Ingredients:

1 pound of boneless, thin-cut, pork loin top loin chop (usually 7 to a package)
3/4 cup vegetable oil
1/2 stick or 4 tablespoons butter
1 1/2 cup flour
2 eggs, beaten
1/2 teaspoon seasoned salt
1/2 teaspoon black pepper
1 teaspoon pork seasoning
1/2 teaspoon dried sage
1/2 teaspoon dried thyme
1 teaspoon dried rosemary
1 teaspoon dried parsley
Salt


Directions:

1. Sprinkle pork on both sides with salt & pepper.

2. In a bowl, whisk together flour, seasoned salt, pork seasoning, pepper, parsley, sage, rosemary and thyme.

3. In another bowl, add beaten eggs. One at a time, bathe each pork lion in the egg, then place in the flour mixture and coat all over.

4. In a skillet, heat oil on medium high. Melt 4 tablespoons of butter in the oil.

5. Place pork loin in the skillet and fry for 9 minutes one side and 5 minutes on the other... or until both sides are a crispy, golden brown and no longer pink in the middle.

6. Place on in a tray layered with paper towel to absorb excess oil.

7. Serve with mashed potatoes and creamed corn.

Friday, December 16, 2011

Christmas Cookies & Homemade Frosting

What would Christmas be without cookies, right? I think this recipe for Christmas cookies is just as good, if not better, than any cookies you would buy in a bakery. They're not difficult to whip up and they're great for getting the family together to make in the kitchen. You can also make a few dozen, wrap them up in gift boxes and mail them off to family & friends for the holidays! Ho, Ho, Ho!!!

Note: There is a recipe for frosting at the bottom. Again, it's easy to make and go well with these cookies.

Note: I didn't add enough red food coloring to my cookie frosting in the photo below... that's why tend to look a bit orange... or tomato sauce red... but they were still delicious!


Christmas Cookies


Ingredients:


1 cup butter, softened
1 cup sugar
2 large eggs
2 teaspoons vanilla extract
1 teaspoon almond extract
3 1/4 cups all purpose flour
2 teaspoons baking powder
1/2 teaspoon salt


Directions:

1. In a large bowl, beat butter and sugar together.

2. Beat in eggs, vanilla extract and almond extract.

3. In another bowl, combined flour, baking powder and salt. Gradually add sugar mixture and beat until smooth. (You may need to get your hands in there as it becomes doughy and mix it. It's ok to get a little messy!)

4. Wrap dough in plastic wrap and place in refrigerator for at least 1 hour.

5. Preheat oven to 350 degrees.

6. Line 2 baking sheets with parchment paper.

7. Roll out the dough on a floured surface and cut cookies shapes out. (If you don't have a cookies cutters, I used the rim of a wine glass to cut out circles.)

8. Place the cut out cookies on the baking sheet and chill for 10 minutes in the refrigerator.

9. Place in oven and bake for 10 minutes.

10. Allow 15 minutes for cookies to cool before applying frosting & sprinkles.


Recipe For Homemade Christmas Cookie Frosting:

Ingredients:
1 cup confectioners sugar
2 tablespoons milk
2 teaspoons corn syrup
1/4 teaspoon almond extract or peppermint extract
food coloring

Directions:
In a bowl, stir sugar and milk until smooth. Beat in corn syrup and extract until it becomes glossy. If too thick, add more corn syrup. Mix in food coloring to your likely.

Wednesday, December 14, 2011

Cooking Tip #7

Store spices in a cool, dark place. Humidity, light and heat will cause herbs and spices to lose their flavor more quickly. Although the most convenient place for your spice rack may be above your stove, moving your spices to a different location may keep them fresh longer.

Monday, December 12, 2011

Curried Cauliflower Rice

I found this wonderful, filling, one-pot, vegetarian recipe in Martha Stewart's little magazine of recipes called Everyday Food, issue 80. I had an extra head of cauliflower that I had to use and some curry in my spice rack and thought I would try something new. I'm glad I did!! This was fantastic! Full of flavor and a big hit in my household. It's also stays well in the refrigerator for a few days and is great as left-overs. I'll be definitely making this again in the near future.


Curried Cauliflower Rice


Ingredients:


4 teaspoon vegetable oil
1 large head of cauliflower, cored and cut into 1 1/2 inch pieces
coarse salt & pepper
1 medium onion, diced small
2 cups of long-grain white rice
5 teaspoons curry powder
1 can (15.5 ounces) chickpeas, rinsed and drained
1/2 cup heavy cream
1 cup Chicken or Vegetable broth

Directions:

1. Preheat oven to 400 degrees F.

2. In a Dutch oven or heavy pot, heat 2 tablespoons of oil over medium-high. Add cauliflower and stirring frequently, until browned in spots.

3. Transfer to plate and season with salt & pepper.

4. Add 2 tablespoons of oil and onions to the pot; cook, stirring occasionally until onion is translucent, 5 minutes.

5. Add rice, curry, and chickpeas and season with salt & pepper. Cook, stirring constantly, until the rice is coated well, about 2 minutes.

6. Add broth and cream and bring to a boil.

7. Scatter cauliflower over the top (do not stir to combine).

8. Cover and bake until rice is tender and liquid is absorbed, 15 minutes.

9. Let cool 10 minutes before serving.

Wednesday, December 7, 2011

Cream Cheese Brownies

This recipe for Cream Cheese Brownies is a total keeper! Yeah, you may have to go to the gym the next day after eating a bunch of them... but they're totally worth it. Trust me! The first batch I ever made I didn't have any pecans or walnuts, but they're so delicious it didn't matter. I made these while performing in an Aida production in Virginia and ended up giving most of them away to the dancers in the show (I figured they all had a faster metabolism than I did and could burn them off faster - they're ridiculously athletic, ya know!) Like a school of piranhas during a feeding frenzy, they devoured these in just a few minutes. I knew right then and there that it wasn't just me, these brownies are crazy good!


Cream Cheese Brownies


Ingredients:

* You're going to have two different types of batter in this recipe - your brownie batter and your cream cheese batter. Make separately, then blend right before baking them.

The Brownie Batter

2 cups sugar
1 cup vegetable oil
4 eggs
6 tablespoons cocoa
1 teaspoon vanilla
2 cups self-rising flour

The Cream Cheese Batter

1 stick of butter, softened
1/2 cup of sugar
2 eggs
1 tablespoon all-purpose flour
1 cup chopped pecans or walnuts
1 package (8 ounces) of cream cheese, softened.


Directions:

1. Preheat oven to 325 degrees.

2. In a bowl, blend together ingredients for the brownie batter (sugar, oil, eggs, cocoa, and vanilla.) Add flour and mix.

3. In another bowl, blend together ingredients for the cream cheese batter (butter, cream cheese, sugar, eggs, pecans, and flour). Mix well.

4. In a grease 13 x 9 baking dish pour half of the brownie batter in.

5. Next, slowly pour in all of the cream cheese batter in the pan on top of the brownie batter.

6. Pour the rest of the brownie batter in the pan.

7. With a knife, slowly swirl the cream cheese and the brownie batter together. Careful not blend them too well... you want some separation between the two.

8. Add a few pecans on top, place in oven and bake for 25 to 30 minutes.

Sunday, December 4, 2011

Cooking Tip #6

How do you tell if an egg is fresh?

Lower uncooked eggs into a bowl of water. If the egg settles horizontally, the egg is fresh enough for human consumption. If it settles vertically, feed it to the dog. If it rises to the top, feed it to the hydrangeas.

Friday, December 2, 2011

The Mighty Meatloaf

This is truly a carnivorous delight and certainly isn't for wimps. Enjoy it with mashed potatoes and brown gravy or a cheesy loaded baked potato. The addition of the pork sausage and bacon strips make this a real favorite for the hungry man... or woman!


The MIGHTY Meatloaf


Ingredients:

1 pound lean ground beef
1 pound ground pork sausage
1 yellow onion, diced
1/2 green bell pepper, diced
2 eggs
1 garlic clove, minced
2 teaspoons Dijon mustard
2 teaspoons Worcestershire sauce
1 teaspoon thyme
1 tablespoon pasley
5 teaspoons milk
1 cup breadcrumbs
2 teaspoons vegetable oil
4 thick strips of bacon
salt & pepper

The Glaze:
1 cup ketchup
1/4 cup brown sugar
2 1/2 tablespoons cider vinegar


Directions:

1. For the Glaze - in a small pan mix together all the ingredients over medium heat until sugar dissolves. Simmer for 5 minutes until thick. Cover and set aside.

2. Saute onions in oil until soft. Stir in minced garlic and saute for a few seconds. Set aside.

3. In a large bowl add all the ingredients, except for the bacon, and mix together well with your hands.

4. Shape meat into a large loaf and lay on a foil-covered baking sheet. Brush with glaze mixture.

5. Broil the meatloaf for 5 minutes. Brush top and sides with the reserved glaze. Lay the 4 strips of bacon across the loaf and broil for 2 more minutes.

6. Brush meatloaf again with the glaze and bake for 45-50 minutes at 350.

7. Let rest for 20 minutes before serving.

Wednesday, November 30, 2011

Southern Tea Cakes

Southern Tea Cakes are like a big, fluffy, white cookie that goes perfectly with your afternoon tea. If you're not a tea drinking (like me), then they're a wonderful treat for any occasion. Offer them to guests when they walk through your door, when the family are over for a visit or hide them and enjoy them as a "secret" midnight snack.

Tip - the dough is VERY sticky... so make sure you have plenty of flour handy.


SOUTHERN TEA CAKES


Ingredients:

4 cups all-purpose flour
1 teaspoon baking soda
2 teaspoons baking powder
2 cups sugar
2 eggs
1/2 cup buttermilk
1/2 pounds butter (2 sticks), softened
1 teaspoon vanilla
1 teaspoon nutmeg
1 teaspoon cinnamon


Directions:

1. Preheat oven to 350 degrees.

2. In a large bowl, add flour, baking powder, baking soda, and sugar. Whisk.

3. Add the rest of the ingredients and blend well.

4. Dough should be soft and sticky. Roll it out onto a flowered surface until approximately 1/4 inch thick.

5. Cut the dough into desired shapes and place on a slightly greased baking sheet.

6. Bake for 10 to 12 minutes.

Tuesday, November 29, 2011

Cooking Tip #5

If you don't have any self-rising flour... make your own!

For every 1 cup of all-purpose flour add 1 teaspoon of baking powder + 1/2 teaspoon of salt.

Mix and... VOILA!... there's your self-rising flour!

Saturday, November 26, 2011

Broccoli, Cauliflower & Cheese Casserole

This is the perfect recipe to whip up if your "none-meat eating" friends are coming over for dinner or if you're wanting to lay off the beef or poultry for awhile. It makes for a great main course and has a wonderful creamy texture that is loaded with flavor. Feel free to use different type of cheeses... or maybe just use one type of cheese. I personally like this combination of cheddar and Monterey jack. Yum! This is also one of those dishes that tastes just as good as leftovers as it does coming right out of the oven... after you reheat it, of course!


Broccoli, Cauliflower & Cheese Casserole

Ingredients:

1 cup bread crumbs
1 cup Parmesan cheese
1 stick of butter
1 clove garlic, minced
1 pound broccoli
1/2 head of cauliflower
1 yellow onion, diced
1 3/4 cups of rice (white or brown)
5 cups vegetable stock
1 1/4 cups light cream
1 teaspoon salt
1 teaspoon pepper
1 cup extra-sharp Cheddar cheese, grated
1 cup Monterey Jack Cheese, grated


Directions:

1. In a bowl, blend together breadcrumbs, minced garlic, Parmesan cheese and 1/2 a stick of melt butter. Texture should be coarse.

2. Cut broccoli and cauliflower into small florets. Place in a pan or stemming pot and cook for a short time - until the broccoli turns bright green.

3. Melt the other half of the stick of butter in a large pot of Dutch oven and saute the diced onion until soft. Add rice and saute for 1 minute - stirring constantly.

4. Add vegetable stock, cream and salt to the pot. Bring to a boil. Reduce heat, cover, and cook for 25 minutes, stirring frequently.

5. Remove from heat and add grated cheeses. Stir.

6. Pour mixture into a greased 9 x 13 inch baking pan. Cover with breadcrumb mixture.

7. Bake at 400 degrees F. for about 15 minutes. Let cool for 5 minutes before serving.

Tuesday, November 22, 2011

Slow-Roasted Turkey

Here's another method on how to prepare a really juicy, moist, slow-roasted turkey. I picked up this recipe a few years ago and have used it ever since. It takes awhile to roast, but delivers a really deliciously moist bird. Good things come to those that wait, right!?


Directions:

1. Preheat oven to 475 degrees. (Yes. I know that's really hot, but trust me.)

2. Take your turkey and slightly separate skin from the meat. Put fresh rosemary and thyme in between.

3. Cover with melted butter on both the outside and the inside. Salt & pepper all over.

4. Bake at 475 for 20 minutes, then lower the temperature to only 250 degrees. Cook at this temperature for 20 minutes fore every pound the turkey is.

Sunday, November 20, 2011

"Cincinnati" Chili

I lived in Cincinnati, Ohio for three years. It wasn't easy. It was a tough transition coming from Long Beach, California - where the beaches were beautiful and the weather was always perfect. Snow was something you only saw in movies... and it looked fun! It's totally not. However, one of the few things I did enjoy about living in the Queen City was the food. Chili is a "big deal" in Cincinnati. They pour it on a heap of spaghetti, throw some onions and cheese on top and call it a "three-way." Weird? Yes. Good. Yes.

I found this recipe at championchilirecipes.com. I figured I'd put it to the test and see how close it came to the Cincinnati favorite I remember. It was very similar and, whether it tasted like Cincinnati chili or not, it's a very good chili recipe and worthy of trying.

My Tip: I added 1 teaspoon of unsweetened cocoa powder. It works great!!


Cincinnati Chili

Ingredients:


2 pounds lean ground beef
1 cup chopped yellow onion
2 tablespoons chili powder
1 teaspoon cinnamon
1 teaspoon garlic powder
1 teaspoon allspice
2 teaspoons sugar
1 teaspoon salt
1 teaspoon pepper
1 teaspoon unsweetened coca powder
1 can (15 ounces) tomato sauce
1 can kidney beans
2 cups water
1 tablespoon vegetable oil
1 cup shredded cheddar cheese


Directions:


1. In a bowl, mix together all the spices (chili powder, sugar, cinnamon, allspice, coca powder, salt, pepper).

2. In a pot, heat vegetable oil on medium-high. Add ground beef and onion. Cook until meat is no longer pink.

3. Drain excess oil and fat from pot. Place back on stove.

4. Add spices to the beef and onion. Stir.

5. Add 2 cups of water. Stir.

6. Add beans. Bring to boil then reduce heat and simmer for 45 minutes, stirring occasionally, uncovered.

6. Serve hot, topped with LOTS of cheddar cheese! ;-)

How to make the perfect Thanksgiving Turkey

I think Chef Jason Hill is fantastic. I've learned a great deal from him by watching his videos and reading his online recipes. Here's a great video on how to prepare your turkey this Thanksgiving.

Click on the link here: Turkey Recipe


Check out other great recipes by Chef Jason at www.cookingsessions.com.

Saturday, November 19, 2011

German Potato Salad

There's a little overpriced grocery store/deli next door to my apartment complex in Philadelphia. Though expensive, they do make fantastic sandwiches, pasta salads and German potato salad fresh, daily. I usually tend to go in there once a week (whenever I'm home), order a hoagie sandwich (honey-smoked turkey on white), and a side order of German potato salad. Now, I've made plenty of potato salad in my lifetime, but never a German Potato Salad. Being inspired by the little deli where I buy it from, I search online for a worthy recipe. Lo and behold, I found an awesome recipe that my partner and I thoroughly enjoyed.

My Tip: I added celery seeds to give it a slightly different texture. I also would recommend chopping up a few spring onions and adding them as a garnish. Make sure you serve this salad warm!


German Potato Salad
by SCHOLLBEE123 from allrecipes.com


Ingredients:


3 cups diced peeled potatoes
4 slices bacon
1 small onion, diced
1/4 cup white vinegar
2 tablespoons water
3 tablespoons white sugar
1 teaspoon salt
1/8 teaspoon ground black pepper
1 tablespoon chopped fresh parsley
1 teaspoon celery seeds

Directions:

  1. Place the potatoes into a pot, and fill with enough water to cover. Bring to a boil, and cook for about 10 minutes, or until easily pierced with a fork. Drain, and set aside to cool.
  2. Place the bacon in a large deep skillet over medium-high heat. Fry until browned and crisp, turning as needed. Remove from the pan and set aside.
  3. Add onion to the bacon grease, and cook over medium heat until browned. Add the vinegar, water, sugar, salt and pepper to the pan. Bring to a boil, then add the potatoes and parsley. Crumble in half of the bacon. Heat through, then transfer to a serving dish. Crumble the remaining bacon over the top, and serve warm.

Thursday, November 17, 2011

Cooking Tip #4

Time it takes to thaw a turkey in the refrigerator.

8-12 pounds... 2 to 3 days
13-16 pounds... 3 to 4 days
17-20 pounds... 4 to 5 days
21-24 pounds... 5 to 6 days

Wednesday, November 16, 2011

Easy Chicken Salad

This developed from my Grandma Letha's recipe for tuna salad. Our family would often joke that Grandma could always find a way to feed any army with just one can of tuna. Though I loved her recipe, I'm still not a huge fan of tuna - hence this recipe for chicken salad. I've added parsley, chopped almonds and red grapes. I find that keeping in the refrigerator for a few minutes makes a difference.


Easy Chicken Salad

Ingredients:

2/3 cup Mayo
1/3 cup Ranch Dressing
1 1/2 tablespoons sweet pickle relish
2 hard boiled eggs, chopped
1 can (9.75 oz) white chicken (or 1 1/2 cups of cooked chicken meat, chopped)
1 teaspoon yellow mustard
8-10 seedless red grapes, halved
1 stalk celery, chopped
1/4 red onion, chopped
1 teaspoon parsley
1/4 cup of almonds, chopped.
Salt & Pepper


Directions:

1. Add all the ingredients in a bowl and mix. Cover bowl with plastic wrap and refrigerate for 10 minutes.

2. Remove from refrigerator and stir. Add to sandwich bread. Serve with sweet potato chips!

Sunday, November 13, 2011

Baked Macaroni & Cheese with Bacon Bits

Macaroni & Cheese is good... but BAKED macaroni & cheese is better!

For some reason I thought making baked macaroni & cheese was much harder than is actually is. It's a wonderful dish you can serve up for several guests and you can always be quite creative on what goes in it. I think adding a bag of real bacon bites (you can find these in the salad dressing aisle at your local grocery store) adds great flavor. How can you ever go wrong with cheese and bacon, right!? I've used different types of cheese... but, thanks to a tip by the ever-reliable, Paula Deen, I was introduced to hoop cheese. It's a type of farmers cheese that can be found in the deli area of your grocery store... next to the other "fancy" cheeses. Some stores may not carry it... usually Whole Foods or Harris Titter will have it... but remember, if you can't find it, you can use any other type of cheese you want.

Tip - Watch how much salt you put in this. Between the bacon bits and cheese, it already has quite a bit of salt. I've learned this lesson the hard way. :-/


Baked Macaroni & Cheese with Bacon Bits


Ingredients:

4 cups of cooked elbow pasta - (boil 2 cups of uncooked pasta.)
1 cup of hoop cheese, chopped up in small cubes
2 cups of grated sharp cheddar cheese - (I just buy the already grated bags of cheese at the store.)
2 cups of grated mozzarella cheese or any other white cheese of your liking.
1/2 stick of butter or 4 tablespoons of butter.
2/3 cup of sour cream.
3 eggs, beaten.
1 cup milk.
1 teaspoon of salt
1 small bag of real bacon bits to garnish
Breadcrumbs for topping.


Directions:

* Preheat over to 350.

* Prepare the pasta as directed. Boil pasta in water in a pot until soft. Drain.

* After draining water, return pot with the pasta to the stove. Reduce heat to low.

* Add 1/2 stick of butter and stir until butter has melted.

* Add the hoop cheese cubes. Stir until almost all of it is melted.

* Add 1 1/2 cup of sharp cheddar cheese and 1 cup of mozzarella cheese.

* Add sour cream, milk and eggs. Stir until it's thick and creamy. Add a little salt or half-bag of bacon bits. Stir again.

* Pours contents of the pot into a greased casserole dish. Top with 1/2 cup of mozzarella cheese and a few breadcrumbs.

* Bake for 45 minutes.

* After 45 minutes, rotate the dish in the oven and add the remaining cheese (1/2 cup cheddar & 1/2 cup mozzarella) a few more breadcrumbs and bacon bits.

* Bake for 10 more minutes.

Serve with a dollop of sour cream and parsley to garnish

Thursday, November 10, 2011

Carrot Cake

I think a piece of carrot cake and a cup of coffee is a perfect way to end an evening of good eating. This recipe, which both Paula Deen and Betty Crocker brand name use in their cookbooks, is certainly one of the most popular online. It's a moist cake, perfectly sweetened with a great, cream cheese frosting to die for!!!


Carrot Cake


Ingredients:

Cake
4 eggs
1 1/4 cups vegetable oil
2 cups white sugar
2 teaspoons vanilla extract
2 cups all-purpose flour
2 teaspoons baking soda
2 teaspoons baking powder
1/2 teaspoon salt
2 teaspoons ground cinnamon
2 1/2 cups grated carrots
1 cup chopped pecans

Frosting
1/2 cup butter, softened
8 ounces cream cheese, softened
4 cups confectioners' sugar
1 teaspoon vanilla extract
1 cup chopped pecans

Directions:


  1. Preheat oven to 350 degrees F (175 degrees C). Grease and flour a 9x13 inch pan.
  2. In a large bowl, beat together eggs, oil, white sugar and 2 teaspoons vanilla. Mix in flour, baking soda, baking powder, salt and cinnamon. Stir in carrots. Fold in pecans. Pour into prepared pan.
  3. Bake in the preheated oven for 40 to 50 minutes, or until a toothpick inserted into the center of the cake comes out clean. Let cool in pan for 10 minutes, then turn out onto a wire rack and cool completely.
  4. To Make Frosting: In a medium bowl, combine butter, cream cheese, confectioners' sugar and 1 teaspoon vanilla. Beat until the mixture is smooth and creamy. Stir in chopped pecans. Frost the cooled cake.

Cooking Tip #3

Fresh vs. Dry Seasonings


When to use fresh. Usually fresh seasonings are best, not always convenient or inexpensive, but certainly the best tasting. There will be certain recipes that require fresh seasonings. One would be pesto. Another might be an Italian salad where you are suppose to actually see the basil leaves ... the "flakes" just won't cut it. Again, fresh herbs almost always enhance your recipe and taste better. Could still get similar results using a dried version, well sometimes depending upon the recipe.

When to use dried. A good example of this would be in the preparation of a salad dressing where the dried herbs become saturated via the oils is a good example. Another good example of the use of dried seasonings is in the preparation of dry rubs that are applied to the meat. Meat has natural moisture and that allows the dried spices to become moist and saturated. Besides, it would be hard to store fresh seasonings in a dried rub.

When you can choose between the two. If you really want to choose one over the other, what is the ratio? Well it sort of depends. We use a ratio of 3-4 parts fresh equals 1 part dried. Sometimes you may want more or less. Another convenient conversion would be 1 Tablespoon equals 1 teaspoon.


The above information is from Barbecue'n On The Internet. Read more @ this link: http://www.barbecuen.com/tip-driedvsfresh.htm#ixzz1dKV3PPa0

Tuesday, November 8, 2011

Roasted Vegetables

I found this recipe by Chef Giada De Laurentiis online on the FoodNetwork.com a few weeks ago and had to try it. I had to make a few changes to suit my palate, but it turned out to be an excellent side dish with roasted chicken (or turkey)... or, for my vegetarians friends, a main course. It would be a great dish for Thanksgiving. Give it a try!

My Tip - I've added a little more salt to this recipe. Giada asks for 1/4 teaspoon, but I felt it was a little bland... so I added a touch more - 1/2 teaspoon to 1 full teaspoon is what I like (I tend to enjoy foods on the salty sides.) She also calls for 3 medium parsnips cut into 1 1/2 inch thick slices - I don't care for parsnips much, so I didn't add them. I added slices of red onion - because I love the taste of Brussels sprouts and red potatoes mixed with red onion. They not only taste fantastic, but they smell great too!


Roasted Vegetables


Ingredients:

- 1/3 cup of extra-virgin olive oil
- 3 carrots, peeled and cut into 1 1/2-inch squares (or you can purchase a bag of small snack carrots already peeled in a bag in the produce section at your local grocery store.)
- 2 cups Brussels Sprouts, halved
- 4 cups of small red potatoes, cut into 1 1/2 inch slices
- 1 cup sweet potato, cut into 1 1/2 inch slices
- 2/3 cup of red onion, sliced (you can use shallots too.)
- 1 tablespoon dried oregano
- 1 tablespoon dried rosemary
- 1 tablespoon black ground pepper
- 1 teaspoon dried thyme
- 1 teaspoon dried basil
- 1/2 teaspoon sea salt


Directions:

Preheat oven to 400 degrees F.

Grease an 11 by 17-inch baking sheet pan with extra-virgin olive oil. Place vegetables in baking sheet and add the dried herbs, salt and pepper. Toss well, evenly coating all the vegetables with the seasonings and oil. Add more oil if the vegetables seem dry

Spread the vegetables evenly on a large baking sheet. Place on middle rack in oven and bake for 35 to 40 minutes, turning the pan about half way through to ensure even cooking.

Sunday, November 6, 2011

Slow-Cooked Rosemary & Garlic Pork Loin

I think the crock-pot was a brilliant invention... right up there with the invention of the wheel!! Ok, I'm kidding... but no, seriously, it's a wonderful tool to have in your kitchen...especially if you're somebody who just wants to fix it in the morning, put in it the pot, go to work, come home and it's ready to eat the moment you walk in the door. You can make a decent meal by just throwing a couple of chicken breasts in, a cup of BBQ sauce, some salt & pepper, and BAM! - Dinner is served! :-)

This recipe takes a little preparation time, but well worth it. The combination of white wine, lemon and rosemary... *sigh*... yum!! I know the searing can be a pain in the butt, but it traps in the flavors of the spices on the meat before you let it sit in the crock-pot for hours. If you don't do this, you'll wash all your spices off when you pour the wine and stock on top of the loin.

A while back, I found the base of this recipe on an iphone application called, "Crock-Pot." I tried it. It was good, but I felt it was missing something. I made a few changes - adding the oregano, pork seasoning, potatoes, and shallots. Now it's perfect... in my biased opinion.


Slow-Cooked Rosemary & Garlic Pork Loin


Ingredients:

2-2 1/2 pound pork loin (with the twine), patted dry
3 tablespoons dried rosemary
1 teaspoon dried oregano
1 teaspoon pork seasoning
4 cloves of garlic, minced
3 tablespoons olive oil
1 shallot, chopped
2 medium-sided red potatoes
1/2 lemon, sliced thinly
1/2 cup chicken stock
1/2 cup white wine


Directions:

1. In a casserole dish, coat the pork loin in 1 tablespoon of olive oil. Salt & Pepper the loin first, then rub rosemary, garlic, pork seasoning and oregano all over.

2. Add thin lemon wedges between the twine. (you can also add chunks of garlic too!)

3. Transfer to a skillet or pan and sear the loin in 2 tablespoons of oil on medium-high heat, on all sides, until slightly brown - about 2-3 minutes each side.

4. Line the bottom of your crock-pot with the chopped shallots.

5. Transfer pork loin to the crock-pot.

6. Place chopped red potatoes around the pork loin.

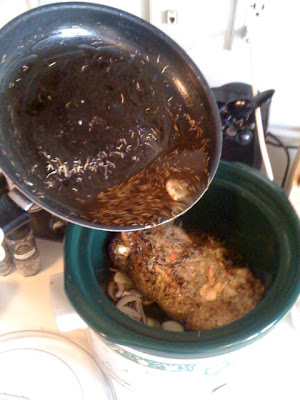
7. Add 1/2 cup of white wine and 1/2 cup of chicken broth to the skillet you used for your pork loin. Stir for a minute, then pour on top of the loin and potatoes.

8. Let cook for 10-12 hours on Low or 5-6 hours on High.

Saturday, November 5, 2011

Cooking Tip #2

" The “mise en place” is the first cooking lesson that my mother taught me. I still do it today. If you prepare all the ingredients – meaning cutting, slicing, measuring – before starting to cook your meal, you simplify the tasks ahead. You will be able to adjust to unforeseen events and be free to experiment with the recipe as you cook it. " - Martha Stewart

Thursday, November 3, 2011

Crustless Cauliflower & Ham Quiche

I found this wonderful quiche recipe on foodnetwork.com. I used to work at a cafe in Turlock, California when I was just out of high school and, aside from serving coffee drinks to our guests and patrons, we had to make freshly baked quiche everyday... from scratch. I remember my co-workers not being excited about making quiche (I'm sure they probably still have nightmares about preparing it.), so I would volunteer to make it whenever I had the time. It can be a little tricky, but it's totally worth it if you make it correctly. I was thrilled to see the use of cauliflower in this recipe, which adds a great texture and absorbs much of the delicious flavor the ham gives off. I had never used Gruyere cheese in a quiche before... but now, after making this, I'm not sure I'd use any other cheese other than Gruyere. This is a PERFECT dish for a Sunday brunch or an afternoon snack. Serve with a dollop of sour cream!

My Tip - 3 things. 1. Make sure you don't over boil your cauliflower. No longer than 8 to 10 minutes. Tops! 2. Make sure you dry the cauliflower as much as possible after boiling it. Try patting it down well with a paper towel... if you don't, the cauliflower will make the quiche soggy. 3. Make sure you allow 20 minutes to cool before serving. This gives the quiche some time to firm up a bit and makes slicing it easier.


Crustless Cauliflower & Ham Quiche


Ingredients:

1/2 head cauliflower, cut into bite-size florets
2 tablespoons extra-virg in olive oil
1 cup chopped white onion, about 1 medium
2 tablespoons chopped flat-leaf parsley
4 ounces deli boiled ham, cut in 1/4-inch cubes
2 tablespoons unsalted butter, softened
2 tablespoons finely grated Parmesan cheese
2 cups half-and-half
2 large eggs
2 large egg yolks
1 tablespoon all-purpose flour
1/2 teaspoon kosher salt
Freshly ground black pepper
4 ounces grated Gruyere or Swiss cheese, about 1 cup


Directions:

1. Preheat oven to 350 degrees F.

2. Bring a large pot of salted water to a boil. Add cauliflower florets and cook until very crisp tender, about 1 minute. Drain in colander and rinse with cold water. Shake off excess liquid.

3. Heat the oil in a large skillet, over medium-high heat. Add the ham and the onions and cook until lightly brown, about 6 minutes. Add cauliflower and parsley and set aside to cool slightly.

4. Brush a 9-inch glass or ceramic pie pan with the soft butter and evenly sprinkle the bottom of the pan with the grated Parmesan cheese. Place pan on a baking sheet. Whisk the half-and-half, eggs, egg yolks and flour in large glass measuring cup. Season with salt and pepper, to taste. Spread half the cauliflower mixture evenly in the pan, top with about half the cheese; repeat with remaining filling and cheese. Pour the custard over the fillings.

5. Bake until the quiche is just set in the center, about 40 to 50 minutes. Cool on a rack before serving.

Wednesday, November 2, 2011

Butternut Squash & Potato Soup

Late Fall & Winter bring some of my favorite types of vegetables every year... including Brussels sprouts, cauliflower, and butternut squash. As it gets colder outside, a good hearty soup can make for a perfect meal. It's only been in the last few years that I've discovered the joys of the butternut squash. It's a great baking squash with a subtle sweetness and texture that go well with other vegetables... or even just by itself.

I love the combined tastes of butternut squash and sweet potato. This soup recipe has been a big hit with my friends recently. It's relatively healthy, easy to make and goes well with salad, baked bread, or as an appetizer.


Butternut Squash & Sweet Potato Soup
by Nathan Stark

Ingredients:
1 butternut squash, peeled, gutted & chopped into cubes
1 large (or 2 medium) sweet potato(es), peeled & chopped into cubes
1 medium yellow onion, peeled & finely chopped
1 carrot, peeled & chopped
1/2 cup of half & half or light cream
5 cups of chicken broth
2 1/2 tablespoons of extra virgin olive oil
pinch of nutmeg
salt & pepper to taste
Parsley to garnish

Directions:

* In a large pot, heat oil. Add the chopped onion until soft.

* Add squash, potatoes, carrot, and broth and bring to a boil. Reduce to low heat, cover, and simmer for 40 minutes or until all the vegetable are soft.

* Process the soup through a blender until smooth. - For those that don't have a blender, you can use a potato masher instead. The soup will be slightly chunkier, but will taste just as good.

* Add cream or half & half and pinch of nutmeg. Stir with a spoon.

* Add salt & pepper to taste and parsley to garnish.

* Serve warm with bread or a salad.

Tuesday, November 1, 2011

Cooking Tip #1

"No Buttermilk? Add 1 teaspoon of distilled white vinegar to 1 cup of fresh milk; let sour for 5 minutes." - Paula Deen

Saturday, October 29, 2011

Southern Fried Chicken

I can't think of anything better than homemade fried chicken. If I was stranded on a deserted island with only one food to eat, it would probably be that. My Grandma Letha, who knew her way around the kitchen, could fry up a bird like no other... and she'd usually served it with homemade cornbread and mashed potatoes & gravy or fried potatoes (which where so incredible when she would just slightly burn the tatters a bit, making them extra crispy!) It was always a treat for the entire family. When I'm away from home and working on a show and there's a kitchen available, it's not at all surprising that you'll see me fixing fried chicken for my friends and/or colleagues. It's the king of all comfort food!! It's taken me a while to perfect a recipe for this All-American, Southern delicacy... but I think I've got it! Move over, Colonel Sanders! :-)


Southern Fried Chicken

Ingredients:
1 to 2 pounds of chicken parts, cut up - (breast, wings, leg, thigh)
3 cups of self-rising flour
3 eggs
1/4 cup milk or cream
1 tablespoon dried parsley
1 tablespoon paprika
1 teaspoon seasoned salt
1 teaspoon ground black pepper
1 teaspoon garlic powder
1/2 teaspoon sage
Peanut oil for frying - (you can use vegetable oil too, but peanut oil is far better for frying.)


Directions:

* Let chicken parts soak in cold salt water (add about 1 teaspoon of salt) in a covered glass bowl overnight in the fridge. (or at least 5 hours)

* The next day remove chicken parts from water and pat dry with a paper towel. Set aside.

* Mix flour, salt, pepper, paprika, sage, garlic powder, and parsley in a large bowl. Whisk to blend well.

* In another bowl, beat eggs and add milk or cream. Whisk.

* Put chicken parts, one at a time, in the flour mixture bowl and coat each piece.

* Coat the floured chicken pieces, one at a time, in the egg mixture.

* Put the chicken pieces back in the flour mixture for a second time, again, one at a time, and coat well.

* In an electric skillet or deep pot heat oil to 350 F. (Do NOT add so much oil that you completely submerge the chicken. Add enough oil to come up about half-way to the chicken when you place each piece in the skillet or pot.)

*Add chicken parts to the oil and fry... about 12 minutes on one side and 8 to 10 minutes on the other. Dark meat usually takes a little longer to fry than white meat. Boneless chicken breasts also take a little longer.

*Place each piece of fried chicken on a plate or bowl lined with paper towel to absorb excess oil.

Welcome!

Welcome to my food blog, folks!!

My hope is to post a new recipe every week... either of my own creation or from others!

Enjoy!
N8